2016 INDEX

Thursday, May 10, 2018


May 10, 2018 – Inexpensive Tool Basket

         I’ve been struggling for years to find the right “tool basket” for my hand tools that I take out into the garden so that I don’t misplace them.  I tried a flowerpot unsuccessfully as it tips over being vase shaped and doesn’t have handles.

         Yesterday I was at one of my favorite haunts – the Dollar Tree – and spotted a blue plastic basket which was just the right size with holes in it.  It cost me $1.00.  It is square so it won't tip over easily.

         The first picture shows the basket, two pieces of rope that I have taped the ends so that they don’t fray and all the tools that I usually carry out with me so that I don’t have to run back and forth.


         I laced the rope in the top outer holes and tied a knot for each handle on the inside.  


Then I loaded the basket and there you have it – completed basket – all tools safely in it that I can haul out to the garden.  If the basket gets dirty – I can simply wash it off.  I even have enough room to slide a collapsing colander in there and can pick a crop before I come back into the house.


         And, there is enough room to add a bottle of water or some seed packets.


         When I am done, I can bring it back to the house and set it inside.

         It looks nice for something so practical and so inexpensive.

Wednesday, May 9, 2018


May 9, 2018 – Chrysanthemum Cuttings

         Lovely rain last night, and cool weather this morning.  Perfect timing for Chrysanthemum cuttings.  If you have never done this – give it a try – it is fun and you will feel “so accomplished” when you have rooted them.

         Hopefully, you will have a Chrysanthemum growing from a last fall planting.  When the growth is about 4 or 5 inches tall, you cut a handful of stems about 4 to 5 inches long.  I always cut them longer when I am out in the garden, I trim them in the house when I am “sticking” them in the growing medium.  Always take more than you need.

         There are many rooting hormones on the market, but I find that the brand Rootone is often available at most stores.  I never stick a stem into the original bottle, I always transfer a spoonful or two into a smaller vessel.  In the past, I have used the caps of perfume bottles – or an old shot glass.  Right now I have one of those miniature jelly jars that are often sold in packs at Christmas – about 1 inch round and 1 ½ tall. It is convenient as it has a cover.  A little goes a long way.


         I fill a six pack cell tray – with purchased starter soil – it is soft and fine and drains well.  Fill your tray or pots and tap them on the counter to settle them, add more soil if necessary.

  
       I hold the stem about 1 inch from the top and keep the top leaves as I strip the bottom leaves off.  Then I snap the lower stem to make the cutting about 3 to 4 inches.  I try to keep them consistently the same size.  I stick the lower stem into the Rootone in the small container, give it a swirl, tap it on the edge of the little jar and then press the stem into the center of the cell block.  Press the soil around the cutting with two finger tips and then move onto the next one.  I do this quickly so that the cuttings do not dry out.  I suggest you do this indoors, instead of out of the wind which can dry your cuttings.  Once you have filled your tray or your pot, use a fine spray to wet them down and let the trays drain.  Excess moisture is not good, not enough moisture is also not good.  I wait until the leaves are dry and no more drips come out the bottom.


         I transfer the pot or six-packs into a small tray and put tall plant stakes on the edges and one in the middle.  Next I take a white garbage bag and open it wide and set pot or tray in the bottom of the bag, pull it up and loosely tie it with a string at the top [usually around the center stake].  I do not put in direct light.  I give it a few days, and then check it for moisture.  I have diffused light in the dining room and that is where I leave it for 3 or 4 weeks.    Every other day I check it for moisture, spritz it with water if necessary and give it some fresh air.

         About three weeks I give one cutting a little tug – if it resists – then I know we have roots forming.  If it strongly resists – I pull it out and check the roots.  It is always exciting seeing those roots.  At the rooted stage, I drop the plastic bag and let them have a bit more light.  At this point, you can pot them up into a larger pot and bring them along, or harden them off and plant them in the garden.


        I prefer potting them up for a bit and getting more roots and top growth outside in a sheltered area.  When you plant them out in the garden, you pinch the growing tips out in order to produce full, bushy plants with more flowers. Continue pinching back every few weeks until midsummer. Yes, this is the hard part, but it does pay off in bushier plants with more blooms.

         Be adventurous and give it a try, this is a fun thing to do.


Tuesday, May 8, 2018


May 8, 2018 – Yes, I have been among the missing.

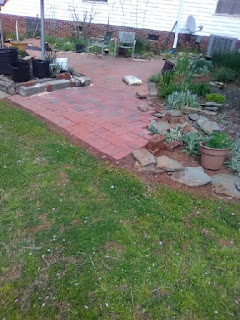
         Sorry everyone – I’ve been absent from my blog.  I have been working in my gardens getting them re-worked and rejuvenated.  My brother will be visiting and I wanted the gardens to look better than the last time he visited.  I am just this week finishing the  edges of the patio back filling with soil and planting some sun loving annuals and a few perennials I've lifted from other parts of the yard. 

         I promised pictures and here are some.  Below is  when I finished the paving on the east apron and I have the flowers to put in on the right side. The rocks will be raised up with bricks and a new rosemary plant and a clump of bearded iris on the right behind the grey rocks will go in.


This is the north side.  I have the flowers to cut in and the white rocks as trim left to do. The walk to the faucet was not yet done.


This shows the full sun and the back portion of the patio. Between the two chairs on the right is the step up to the water faucet path.  In the foreground are the Siberian Iris giving us the annual show.


This is a close up of the Siberian Iris which will edge all the way to the left.  I have propagated clumps that are now in bloom and can't move them until they cease blooming.  They will run the full length of the back of the house.  But this shows the little white rocks that create the spill way for the rain from the gutters coming off the roof.


         I also planted much of  the vegetable garden this last week – tomatoes, beans, cucumbers, summer squash, zucchini, basil, egg plants, green peppers.  In a few weeks I will put in the winter squash and possibly try parsnips and celeric again. The garlic bulbs I planted last fall are looking good. 

Even some of my lavender is looking good though I did not correctly cut it back this spring because it looked completely dead – yet now it looks like I have more green than dead.  I love lavender, but it sure isn’t easy for me to grow. [Few years back I took an on-line course on growing Lavender and I will admit, it hasn't helped my green thumb a bit when it comes to the plant.]  I did locate a few Lavender var. Phenominal this year and we shall see if they are the right plant for this area.  I will advise later when they are blooming.

I’ve been lifting and dividing some of my perennials and am thinking of going into the nursery business as my retirement job. Will give me an excuse to "play in the dirt" and be paid for it.


This is a close up of a one Liriope muscari variegata that I lifted and divided. I find this is a work-horse type plant in the garden.  Makes a great edging and gives the garden a great back bone for a design.  Most of my shade gardens are edged with this.  Some have a bit more sun, but this does exceptionally well in the shade and semi-shade.  


Above is the divided Liriope and some Hostas.  They will come along nicely in the nursery garden.

Lastly, I planted the Caladiums thinking that the night temperatures were warm and settled near the 60s, yet this morning I woke up to the 40s.  Not a good thing – they don’t like wet and cold.  Hopefully the soil in the pots stayed warm enough and will warm up again today.

If you have been out there in the gardens working – tell me what the secret is to the weather.  I expected rain Friday, Saturday and Sunday – as it was forecasted and got – what – hardly nothing.

And, a follow-up on my April 17, 2018, blog of How to stop a water leak in a Lincoln Towncar – HEY, HEY – it worked – no longer a wet passenger side rug.

Thanks for visiting everyone - especially my traveling friend who checked out my blog from Slovakia – love you – I know you are having fun. 

I also was tied up with a four-week writing class that took much time away from other projects and my Blog.   More pictures in the future - I finally figured out the technology - that is a good thing for my blog friends.


Monday, May 7, 2018


May 7, 2018 – New Coffee Maker

         I had this nice little one cup coffee maker – not one of those pod things, that was electric.  But, alas, it did not last – it was left on by mistake and that was the end of it after about 3 months.  So, I wasn’t ready to fork out $40 for another three months.


         But, something caught my attention in a recent gourmet chef catalogue.  A pour-over coffee brewer – that is porcelain and is not electric.  You boil the water in a tea kettle and then pour it over the coffee grounds.  I had never seen one before – I must live under a rock at times – and it piqued my interest.  I shopped around and ordered a Melitta 6 cup brewing pour over with carafe.  Pictured above – very simple, very easy to use and to clean and I am surprised at how well it makes coffee.

         I also noticed when I went on line to Melitta.com that these have been in existence since 1908. Check it out at https://www.melitta.com/en/Our-passion-through-the-years-1696,68876.html

         I consider the coffee hot enough – as I don’t like to burn the roof of my mouth.  After I pour my first cup, I put my “tea pot” cozy around it with a little clip and it keeps my second and third cup hot enough for me.  But, if you want it hotter, then you can pour it into a thermos. 

But, it is so classic looking and simplistic – it appeals to me and it might appeal to you.

         I have always enjoyed the old-fashioned “KISS” approach to life.

Keep it simple, stupid.

And this is a perfect example – makes a great cup of coffee!